How To Improve Your Photography During Isolation
Are you feeling trapped at home? Limited movement allowed only in your direct vicinity? For some people out there, you may be confined to the house and yard? This is most definitely a difficult time for everyone, however, there are things you can do to alleviate the boredom. One easy solution is to practice your photography skills. Today we discuss five things you can do in and around the home that will improve your photography. Not only will this improve your photography in general, it will help your underwater photography as well.
Practice Your Bokeh Skills
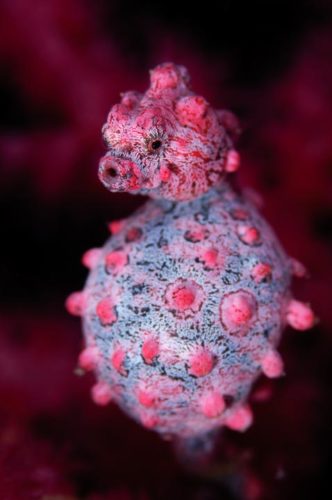
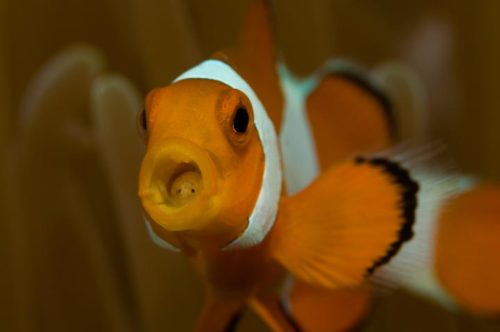
Macro photography is an easy one to practice at home. If you have a garden then you are at a definite advantage. Flowers, leaves, or even blades of grass make beautiful subjects. Finding beautiful insects like lady bugs, crickets, or jumping spiders will add an extra layer of delight.
Once you have found your subject, it’s time to practice a new skill. Instead of shooting these objects with f16-22 for maximum depth of field, lets do the opposite! Try to create a limited depth of field (bokeh) effect by using a wide open aperture such as f2.8 – f4. (Some lenses can even open more) This is not the easiest technique and will create challenges for your focusing abilities. However, when you get it right the blurred backgrounds really make the subject stand out. I would suggest you focus on the eyes if shooting insects, and focus on an area of contrast if shooting flowers.
Quick Tip
Use Aperture Priority mode (if available) so you don’t have to worry about the shutter speed too much. Be sure to have plenty of available light
 Turn Off the Lights
One piece of advice that I often tell students is to learn where all of the controls on the camera are. This is very important underwater when action can move quickly. Spending time at home is the perfect way to practice this idea. It’s simple, turn the lights off (or to a lower power) and try to remember where you shutter speed and f-stop controls are. Of course you also will want to remember which way to change them! These are the two most commonly accessed controls while shooting underwater. Once you can find these two controls in the dark it’s easy to remember where they are during a dive. Once you have mastered the f-stop and shutter dials, move on to ISO and other functions.
Quick Tip
Put your camera in the housing and practice f-stops and shutter speed again. Do it for a few minutes every day until it becomes natural. This will allow you to react quickly underwater to sudden changes.
Manual Focus
One of the most challenging aspects of photography can be focusing. In this day and age of modern cameras, everyone tends to rely on the fast auto focus most cameras are capable of. However, there comes a time in underwater photography when manual focus is a benefit. This is especially true in macro photography. Obviously not everyone will have manual focus rings that fit on the lens and inside the housing. But many cameras don’t need it to achieve manual focus. Many compact cameras offer it with a twist of a dial.
For those using SLR or Mirrorless cameras, the back button focus trick is a “semi manual” option. The best way to practice using manual is simply to find an everyday subject such as a pen or coin and start shooting. Move as close as you can and turn the focus dial until the subject comes into focus. Not focusing? Simply back up a little until it does. Now, move onto the next subject and try again. You will quickly learn which way to turn the dial and learn where your closest focus capability lies.
Quick Tip
When using the rear focus button technique, simply put your hand in front of the camera and focus on that as close as you can. Now, stop pressing the button and find a small subject. Get in close to the subject and rock back and forth with the camera until the subject comes into focus. You don’t need to press the button again. This is a great way to focus on tiny subjects like ladybugs.
HDR Photography
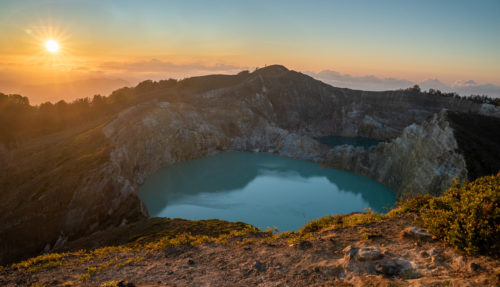 Have you ever seen a photograph online that seems to jump off the page with detail? Often a photo where there is incredible detail in the highlights as well as in the shadows even when shooting toward the sun? What may seem like an impossibility is actually HDR photography. HDR stands for High Dynamic Range, which basically means the ability to bring out detail in both shadows and highlights on the same photo. The most common way to create this style of photo is to take a series of the same photo and stitch it together with post processing.
Here is what you will need to do it: a camera that can change exposure manually, a tripod (or a very steady hand), and software such as Lightroom. This is an especially effective technique when shooting landscape photography or still life imagery. It’s not a common technique underwater as everything is constantly in motion. My favorite way to shoot HDR is to set up on a tripod and focus in on a wide angle scene such as a mountain range or other landscapes. Then I take a series of images with 5 or 6 different f-stops. The key is to both overexpose on one end and underexpose on the other end. If you don’t have manual settings you can create the same effect using the “exposure compensation” button.
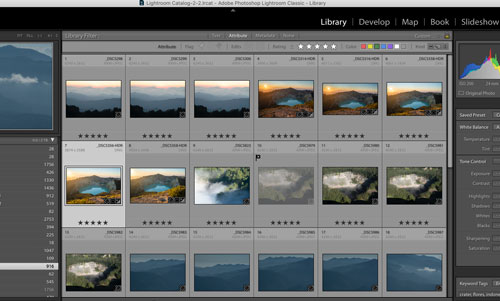
Once you have 5 or 6 photos ranging from under to over exposed, you will need to import them to Lightroom as a series. Once they are imported Lightroom has an automatic HDR process that will create a wonderful high dynamic range photo of your set.
Quick Tip
If you don’t have a tripod, simply find a steady place to place your camera. A great portable item that you can pack easily is a small “bean bag” that is heavy, yet soft enough to cradle your delicate camera.
Take an Online Learning Class
 Not only are you stuck at home at the moment, many of your favorite professional photographers are as well! Take advantage of the new and exciting online materials that are popping up on a daily basis. YouTube is a great resource and there are literally thousands of photography tutorials on there free of charge. However, if you are interested in a more tailored experience, think about enrolling in a “one to one” photo coaching session. This is the best way to concentrate on the skills that you are looking to improve. If underwater photography is your goal, we offer “One to One” Photo Coaching on demand. We will work with you to improve the exact skill you are having difficulty with.
Quick Tip
One of the easiest skills to learn at present is Post Processing. Lightroom is the best way to keep track of and process your photos. The team at Underwater Lightroom offer an online course that is specifically aimed at underwater photographers. This is a great product as it concentrates on the post processing issues specific to underwater such as backscatter.
We know that many people are having a hard time at the moment. However, try to keep positive in this environment and look at it as an excuse to learn a new skill. Improve your photography at home by setting aside 30 minutes per day to work on these skills. Time is a precious commodity and you don’t want to waste this opportunity to improve, whether it’s in photography, music, or even learning a new language.